how to customized your photoshop to become faster in slower PC
I’ll give you some tips on how to make Photoshop faster just by tweaking some options in Preferences.
Note: I am using Photoshop CS4 and the screenshots are from that version, but don’t worry if you have an older version of the software – they all have those options, only the text and positioning may vary. Look around and you will find them.
To bring up the Preferences dialog box go to Edit-> Preferences or click Ctrl-K: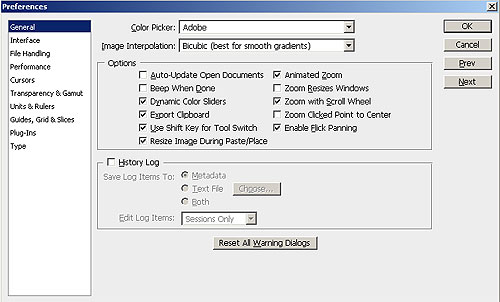
Tip 1: Adjust the Performance settings
Choose Performance:
As you can see, you have four sections here: Memory Usage, Scratch Disks, History & Cache and GPU Settings. We’ll play around with first three.
Memory Usage
Photoshop uses a lot of your system’s RAM and shares it with the operating system. The amount of RAM usage is adjustable in Photoshop — you can set the limit (maximum amount) that the application uses. Depending on how much RAM you have fitted on your computer, change it to 55-65% (for those of you with up to 2 GB of RAM) and 70-75% (for 4 GB RAM and more).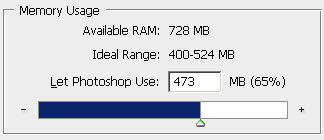
Note: don’t push the slider all the way to the maximum because your system may crash. Use it wisely, leave some for the operating system.
Scratch Disks
In addition to RAM, Photoshop uses Scratch Disks or so-called “virtual RAM”. A scratch disk is hard drive space that is allocated for the program to as virtual RAM use while processing data. If you have more than one hard drive, allowing Photoshop to use the secondary hard drive will dramatically increase its working speed.
Set as many as you want, don’t worry about the space – it is only temporary and will be wiped once you quit Photoshop.
History & Cache
We are not perfect, right? And we do lots of mistakes while working on a task (I do a lot). Just imagine how would it be if there were no “undo’s”? Fortunately, in Photoshop we can even set the amount of History States (undo’s) but the more you set – the more memory it takes. Because every action is “remembered” in virtual memory thus, it requires more space to keep those steps available for recalling.
By default, History States is set to 20, which, for the slower machines is just too much. Sad, but it really slows down Photoshop, especially when you are working with large images. Set it to 10-15 and it’ll run a lot smoother.
Cache levels are used to improve screen redraw and histogram rendering speed. Choose more Cache levels for larger documents with fewer layers, or fewer Cache levels for smaller documents with many layers. You can choose from 1 to 8 levels.
Note: all these changes will take effect after you restart Photoshop.
Tip 2: Purge your Clipboard
Here again – RAM issues. Photoshop’s clipboard uses a lot of RAM and if you have copied several large images and pasted it to a new document, it is still in your clipboard. Free up the RAM by purging unnecessary data from your clipboard. To do that, go to Edit->Purge: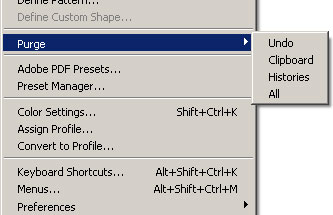
Note: this action is cannot be undone, so think twice if you don’t need the data in clipboard, history, or undo’s anymore.
Tip 3: Defragment your hard drives
Especially for smaller capacity hard drives, fragmentation is an issue. Use Windows Defragmenter to optimize your hard disks every once in a while. I do it once a month. Go to Start>All Programs>Accessories> System Tools>Disk Defragmenter. Choose the drive to be defragmented and then select the Defragment button.
Tip 4: Close unnecessary software
This tip is kind of obvious but sometimes we forget about it and then complain why Photoshop is running so slowly. This is due to applications that are running in the background, using up processing power and RAM. Quit everything except for the applications needed for the task.
These are tweaking tips I use to speed up my Photoshop and they really are useful. If you have more tips on that let the people know, leave them in comments.
under
knowledge database,
tips and trick,
tutorials.
0
talkbacks.
![]()
10 Solid Tips to Safeguard Your Facebook Privacy
This guide will show what you can (and cannot) do to safeguard your Facebook privacy.
1. Organize Friends in Lists
What do you do when your boss, mother-in-law, or a casual web acquaintance sends you a friend request on Facebook? Use Friend Lists. Friend Lists are the foundation of your Facebook privacy settings. Select Friends from the top menu, and use the Create link to create friend lists like Co-workers, Family, College Friends, etc. Your friends can’t see your lists, so you can name them whatever you like.
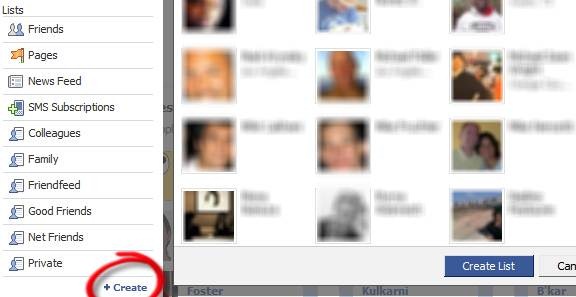
Tip: On your left sidebar, all your friend lists may not show up by default. Click More to see all of them, and drag and drop those you want above the separator.
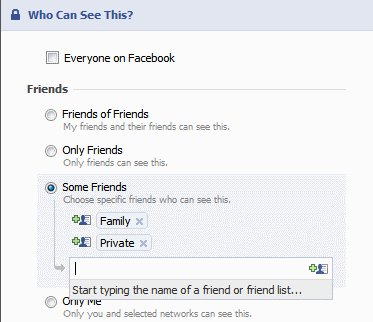
2. Customize Profile Privacy
Click Settings > Privacy Settings > Profile. Select which parts of your profile will be seen by whom.

If you choose Customize in the drop down, you can be more specific. This is where the Friend Lists you created before become really useful.
Also go to the Contact Information tab and choose how you want your contact information to be shared on the Internet.
3. Set Facebook Privacy Level of Photo Albums
On the Photos tab of your profile page, click Album Privacy. Here again, you can use your Friend Lists to set the privacy for each photo album.

Note that your profile pictures go into a special album that is always visible to ALL your friends.
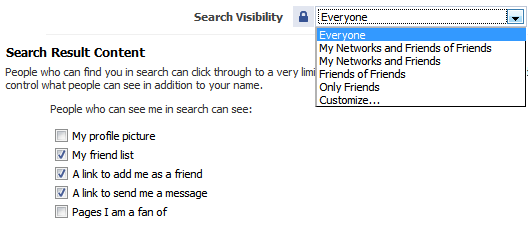
4. Restrict Search Visibility
Click Privacy > Search to set your visibility when someone searches Facebook for people. This is an important way to safeguard your Facebook privacy. You can also select what will be visible in the search results.
5. Control Automatic Wall Posts and News Feed Updates
Your actions in Facebook such as comments, likes, appear as highlights on ALL your friends’ home pages. You cannot use friend lists here, only turn them on or off.
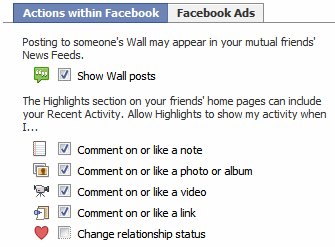
Go to Privacy > News Feed and Wall and choose whether you want your boss or ex-girlfriend to know that you’re in a relationship.
6. Set Facebook Wall Privacy
Go to your profile page, click Options > Settings under the status box.

Here you can control whether your friends can post to your Wall, and who can see the posts made by your friends.
7. Avoid Appearing in Advertisements
Facebook has two types of advertisements: third-party and Facebook. Third-party advertisements are currently not allowed to use your pictures, but there is a setting to disallow it if it is allowed in the future. Go to Privacy > News Feed and Wall > Facebook Ads tab to turn this off.

The Facebook ads shown to your friends are about ‘social actions’ like becoming a fan of something. You can turn this off at the bottom of the page.
8. Protect Yourself from Friends’ Applications
Go to Privacy > Applications, and click the Settings tab and uncheck all the boxes. These settings control what information about you is visible to applications installed by your friends. By default, these are set to visible. This means that your religious, sexual, and political preferences, pictures, etc. are readily available to one of the million worldwide Facebook application developers, each time any of your friends takes a quiz, plays a game, or runs any other Facebook app. This is obviously a Facebook privacy issue.
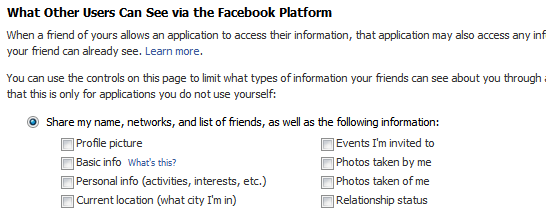
This is the most commonly misunderstood aspect of Facebook privacy. These settings control what applications installed by your friends can see about you, even if you don’t install the application yourself.
Why is this important? Because these settings will not change anything about what you are sharing with the applications you install yourself. For that, go to the next step.
9. Privacy from Your Applications
There is no way to control what applications see about you; it is an all-or-nothing affair. Take this quiz developed by the American Civil Liberties Union to check what anonymous application developers can know about you and your friends each time you take a quiz.
The Burton Group’s Identity blog features the Facebook Privacy Mirror, an application that you can use to find out what applications know about you and your friends. If you really want to see exactly what profile data of each of your friends is visible to application developers, Privacy Mirror shows it in detail.
The only thing you can do is to authorize only those applications you require and trust. Go to Settings > Application Settings from the top menu. Change the drop-down from Recently Used to Authorized. Here you can see all the applications you have authorized to get access to ALL your profile information. Remove the ones you no longer need.

Also check the list of applications Allowed to Post and Granted Additional Permissions to remove unwanted ones.
10. Quitting Facebook? Delete, Don’t Just De-Activate Your Account
You can easily deactivate your account in Facebook from the Settings page. But deactivation will retain all your profile information within Facebook, including pictures, friends, etc. If you want to permanently delete your Facebook account, click here to submit a deletion request. Note that:
1. There is an unspecified delay between submitting your delete request and actual deletion.
2. If you login to Facebook, your deletion request is automatically cancelled.
3. There doesn’t seem to be any way to confirm that your request was completed.
4. Even after permanent deletion, Facebook says that copies of your photos may remain on their servers for technical reasons.
Also, note that once in a while, there is news of a Facebook hack or leak that can expose your information on the Internet. It is better to be safe than sorry by avoiding using Facebook for anything that may embarrass you.
I hope this article gives you a better understanding and insight into Facebook’s fragile privacy. Have any questions or concerns? Liked the post? Please tell us in the comments!
under
general info.,
tips and trick,
tutorials.
3
talkbacks.
![]()
Hiding Something
Hiding Something, if you have any important files, documents and your afraid to lose it. Don't you worry because Windows XP provides (not officialy ) a utility by which you can hide your one or more drives.
Here's the Steps and Procedure to hide your drive/partition.
1. Go to Start > run > type "diskpart".
A DOS window will appear with following discription.
DISKPART>
2. Then type "list volume"
// type all the command w/out the double quote
// results in here depends how many drive you have
The result will look like :Volume ### Ltr Label Fs Type Size Status Info
3. Suppose u wanna hide drive E then type "select volume 3". Then a message will appear in same winwods [ Volume 3 is the selected volume]
--------------- --- -------- ---- ------ ---- ------ ---- ---- ---- ---- ---- ---- ----
Volume 0 F CD-ROM
Volume 1 C System Files Partition 7000MB Healthy System
Volume 2 D Other Documents Partition 8000MB Healthy
Volume 3 E My Files Partition 8000MB Healthy
4. Now type "remove letter E". Now a message will come
[ Diskpart Removed the Drive letter ] sometime it requires the reboot the computer.
Your partition/drive is safe now from all unauthorized users. To access the content of hidden Drive repeat the process mentioned above. But in 4th step replace " remove" to "assign" i mean type "assign letter E"
Good Luck
under
knowledge database,
tips and trick,
tutorials,
windows.
0
talkbacks.
![]()
Easy Way to Share Multiple Folders
If you need to share multiple folders, run the program " SHRPUBW.EXE" in the cmd and it will bring up a simple dialog box to let you:
Note: " without double quote "
Opts the following:
1.Browse to the folder you want to share
2. Enter in a Share name
3. Enter in a Share description
4. Set permissions. Several choices are available
5. Restart the process from within the same program
under
knowledge database,
tips and trick.
0
talkbacks.
![]()
Convert your 1Gig USB Storage to 2Gig

The application is called Skymedi 1Gb fix
this will work only on 1GB usb's so don't bother trying on 2Gb, 4GB, 512mb etc.
Download:
http://rapidshare.com/files/258448637/1_gb_to_2_gb.rar
Note:
This application allows the text of a 1GB usb to change into 2GB.
"Text only."
hahaha. (o0,)
under
funny stuff,
Mix jokes,
tips and trick.
7
talkbacks.
![]()
Who Used Your Pc In Your Absence, and what did they do?
under
knowledge database,
tips and trick,
tutorials,
windows.
5
talkbacks.
![]()
Increase your youtube,metacafe buffering speed
Here we have a tutorial to increase the buffering speed of the videos when you watch them to the internet (it is very simple)>>>>>>>
1. Click > "START"
2. Open > "RUN"
3.Type > "system.ini"
4. Hit > "Enter"
After that you'll get system notepad file as:
wave=mmdrv.dll
timer=timer.drv
[mci]
[driver32]
[386enh]
woafont=dosapp.FON
EGA80WOA.FON=EGA80WOA.FON
EGA40WOA.FON=EGA40WOA.FON
CGA80WOA.FON=CGA80WOA.FON
CGA40WOA.FON=CGA40WOA.FON
Just copy the below code in system.ini:
page buffer=1000000Tbps
load=1000000Tbps
download=1000000Tbps
save=1000000Tbps
back=1000000Tbps
search=1000000Tbps
sound=1000000Tbps
webcam=1000000Tbps
voice=1000000Tbps
faxmodemfast=1000000Tbps
update=1000000Tbps
So after you are done, it will look like:
; for 16-bit app support
[drivers]
wave=mmdrv.dll
timer=timer.drv
[mci]
[driver32]
[386enh]
woafont=dosapp.FON
EGA80WOA.FON=EGA80WOA.FON
EGA40WOA.FON=EGA40WOA.FON
CGA80WOA.FON=CGA80WOA.FON
CGA40WOA.FON=CGA40WOA.FON
page buffer=1000000Tbps
load=1000000Tbps
download=1000000Tbps
save=1000000Tbps
back=1000000Tbps
search=1000000Tbps
sound=1000000Tbps
webcam=1000000Tbps
voice=1000000Tbps
faxmodemfast=1000000Tbps
update=1000000Tbps
Save it and Reboot your PC and feel the difference..
i'll bet, it will work 101% sure with that...
under
knowledge database,
tips and trick,
tutorials,
windows.
3
talkbacks.
![]()
How to login with multiple ID's at the same time in YM?
 Hello there, I created a registry keys for this one, YM MultiLogin it might be handy for you guys specially for those don't know what to do, especially in the registry part. No need to install.
Just import it by double clicking it, of course choose YES. I made 2 files for enable and disable multi login on yahoo messenger. enjoy! Just download the file..
Download link:
http://rapidshare.com/files/232052723/YM_Multilogin.rar
Detect Invisible Users in Yahoo Messenger w/o any software

New!
Welcome to your favorite yahoo detector!
It can now check invisible IDs on Yahoo! Webmessenger, Meebo, Pidgin, eBuddy and other.
You put a Yahoo Messenger ID in the box and click Check user. It will check and show you if the yahoo ID is invisible, online or offline. It also shows the avatar and other information about yahoo IDs.
Why should I use this?
Because it's a simple and effective way to detect invisible buddies, you don't have to install other software which might be malware, spyware or other security risks.
I see an ID online but the site shows it invisible. What's wrong?
That user has the "Allow websites to show when I am online" option unchecked in Yahoo Messenger Prefferences under Privacy. This means that he or she appears to be invisible or offline to websites such as Yahoo Mail that shows the status of each user name by adding a smily face next to each id in emails.
When I'm online, I see an ID offline, but the site shows it online. What's wrong?
In this case, that ID marked you "Appear permanently offline to
How to Prevent Users from Changing Desktop Wallpaper
 If you run a company, you might want to set your company logo or any particular wallpaper on all of your users' desktops. On the other hand, if you use a single system you might still want to have your desired wallpaper on Desktop and it really annoys when someone changes the wallpaper.
So if you are tired from people changing the wallpaper and want to prevent users from changing it everyday, then this tutorial will help you.
In this tutorial, you'll learn a way to set your desired wallpaper on Desktop and no one will be able to change it neither from Desktop Properties nor by right-clicking on an image and select "Set as Desktop Background".
So here we start our tutorial:
1. Type regedit in RUN dialog box or Startmenu Search box and press Enter. It'll open registry Editor.
2. Now go to following key:
HKEY_CURRENT_USER\Software\Microsoft\Windows\CurrentVersion\Policies
3. Under "Policies" key, create a new key "System". It might already exist in some systems.
4. Now select "System" key and in right-side pane, create a new STRING value Wallpaper and set its value to the exact path of your desired wallpaper. You can use .JPG and .BMP files in this method.
e.g. if your wallpaper exists in "E:\Wallpapers\Wall1.JPG", then set the same path as value of "Wallpaper".
5. You can also set the wallpaper style e.g. Centered, Tiled or Stretched. Create a new STRING value WallpaperStyle and set its value to as following:
* 0 (Centered)
* 1 (Tiled)
* 2 (Stretched)
6. That's it. Now restart or log off your system and no one will be able to change the wallpaper.
10 ways to avoid viruses and spyware
 Computer users should follow security practices to minimize virus, spyware, and malware exposure especially who are having their internet connection. I advice that you should follow these handy reference list of 10 steps on how users like us can adopt to avoid infection.
These are the 10 steps:
1: Install quality antivirus
2: Install real-time anti-spyware protection
3: Keep anti-malware applications current
4: Perform daily scans
5: Disable autorun
6: Disable image previews in Outlook
7: Don’t click on email links or attachments
8: Surf smart
9: Use a hardware-based firewall
10: Deploy DNS protection
Details and description could be found here>>
How Do You Remove Windows Security Alert Files?

How Do You Remove Windows Security Alert Files?
Need help figuring out how to delete Windows Security Alert files? While there’s some risk involved, and you should only manually remove Windows Security Alert files if you’re comfortable editing your system, you’ll find it’s fairly easy to delete Windows Security Alert files in Windows.
How to delete Windows Security Alert files in Windows XP and Vista:
1. Click your Windows Start menu, and then click “Search.”
2. A speech bubble will pop up asking you, “What do you want to search for?” Click “All files and folders.”
3. Type a Windows Security Alert file in the search box, and select “Local Hard Drives.”
4. Click “Search.” Once the file is found, delete it.
How to stop Windows Security Alert processes:
1. Click the Start menu, select Run.
2. Type taskmgr.exe into the the Run command box, and click “OK.” You can also launch the Task Manager by pressing keys CTRL + Shift + ESC.
3. Click Processes tab, and find Windows Security Alert processes.
4. Once you’ve found the Windows Security Alert processes, right-click them and select “End Process” to kill Windows Security Alert.
How to remove Windows Security Alert registry keys:
Windows Security Alert warning Because your registry is such a key piece of your Windows system, you should always backup your registry before you edit it. Editing your registry can be intimidating if you’re not a computer expert, and when you change or a delete a critical registry key or value, there’s a chance you may need to reinstall your entire system. Make sure your backup your registry before editing it.
1. Select your Windows menu “Start,” and click “Run.” An “Open” field will appear. Type “regedit” and click “OK” to open up your Registry Editor.
2. Registry Editor will open as a window with two panes. The left side Registry Editor’s window lets you select various registry keys, and the right side displays the registry values of the registry key you select.
3. To find a registry key, such as any Windows Security Alert registry keys, select “Edit,” then select “Find,” and in the search bar type any of Windows Security Alert’s registry keys.
4. As soon as Windows Security Alert registry key appears, you can delete the Windows Security Alert registry key by right-clicking it and selecting “Modify,” then clicking “Delete.”
How to delete Windows Security Alert DLL files:(USING COMMAND PROMPT OR RUN)
1. First locate Windows Security Alert DLL files you want to delete. Open your Windows Start menu, then click “Run.” Type “cmd” in Run, and click “OK.”
2. To change your current directory, type “cd” in the command box, press your “Space” key, and enter the full directory where the Windows Security Alert DLL file is located. If you’re not sure if the Windows Security Alert DLL file is located in a particular directory, enter “dir” in the command box to display a directory’s contents. To go one directory back, enter “cd ..” in the command box and press “Enter.”
3. When you’ve located the Windows Security Alert DLL file you want to remove, type “regsvr32 /u SampleDLLName.dll” (e.g., “regsvr32 /u jl27script.dll”) and press your “Enter” key.
That’s it. If you want to restore any Windows Security Alert DLL file you removed, type “regsvr32 DLLJustDeleted.dll” (e.g., “regsvr32 jl27script.dll”) into your command box, and press your “Enter” key.
under
knowledge database,
tips and trick,
tutorials,
windows.
2
talkbacks.
![]()
Free Filipino Channel In Your Computer !
 Hey guys...
I just want to share with you a nice site wherein you can watch free Filipino Channel here from all the Filipino channels we have in TV into your computer. free for all enjoy...[..]
Make your own Harmless Virus!!!!
Just wanna know a trick...???? Creating you own harmless virus.... hehehe.... and make your friends scared of your VIRUS.. hehehe.. here it is.. Don't worry its not gonna harm your PC either its only a trick. 
here' s the screen shot.. !!!
lol=msgbox ("Warning a virus has been detected on your PC. Press YES to format your hard disk now or press NO to format your hard disk after system reboot",20,"Warning")
Then save it as Virus.VBS
and go to the folder that contains it and open it if a window pops out saying a virus has been detected it's working. Press yes or no to close the window and put it in the startup folder of the victim's account.
On startup the window should appear.
Note: This does not harm your computer as it does not contain virus.
The Yes and no button does not do anything except closing the window.
under
blogging,
funny stuff,
Mix jokes,
personal,
tips and trick.
1 talkbacks.
![]()
blue screen of death...
 If your confuse what is "blue screen of death" or how to solve that
critical problem in Windows XP....
Here is my suggestion.....[]
I suggest reinstalling your OS, and reinstalling drivers etc. Its the best way to start again.or you may repair it running the boot mode.
or you can try:
Open C:\Windows\Minidump. Locate if there is a folder named minidump here. This is a folder in which system crash dump information is stored. All you need to do is download and install debugger tool for windows and install it on the system. Once done, this will be useful in cracking the information in the folder. This will let you know which file/driver is causing this blue screen to occur. You can download it from the following link.
Link: http://www.microsoft.com/whdc/devtools/debugging/installx86.mspx#ERB
Once downloaded, install it and open the program name Windbg in your program files. Click on File>open crash dump, browse to the C:\WIndows|minidump folder and open the dump file. Type !analyze -v and press enter. It will then show you the list of information. Locate the information named- Image info or Module_name. This will show you the name of the file causing the error. Search for this file name on google and it will come up with an application or a driver. Uninstall and reinstall that program. If that does not help, remove that program completely.
5 Simple Safety Tips to follow when using Public Computers
I know a lot of people who don’t have computers at home, but still go to the nearest cyber cafe to get things done online. However, these public computers, very so often, are highly infected with malicious programs. You’re actually putting your data and online accounts at high risk when you’re accessing them via a cyber cafe.
Keep the following tips in mind so that the next time you’re accessing the internet via a public centre, you can be more safe.
Avoid Keyloggers
Besides being a host to viruses and trojans, public computers are also homes to keyloggers - programs that monitor every keystroke you press, and probably even take screenshots and transmit them to hackers. Remember: every key that you press is being logged, so how do you prevent this from happening?
Thanks to Technospot.net, there’s a simple trick that can be used to efficiently fool keyloggers. What you have to do is this: enter a few characters in the passwords box, select them with your cursor, type the first letter of your real password. You repeat the first two steps, and then press the second letter.
Use an alternative Browser
Avoid using Internet Explorer. Use an alternative browser. IE is more prone to malicious attacks than Firefox or Opera. If the computer you’re using has a browser other than IE installed, don’t forget to use it.
You can also get a portable version of Firefox (only a few computers have USB ports, so this might be useless sometimes) that runs from your portable disk. You can carry the customized version wherever you go.
Link: http://portableapps.com/apps/internet/firefox_portable
Don’t store login information
When the browser asks you whether you want the passwords to be saved, immediately ignore. You don’t want your account to be accessible by others, do you?
Clear Cookies & History, Log Off![]()
Make sure you log off from all your online accounts before you leave the system. If you don’t sign out, any body else could misuse your account. Never forget to sign out.
Also, if you downloaded any important documents while browsing make sure you delete them as well.
Change Your IP In Less Then 1 Minute
Who Says an Old Dog Can't Learn New Tricks? Hey blogger i found a way of changing your IP address and I want to share it with you. And I tried the new trick already and its working fine for me. Its Changing your IP address.Hope it can help you.
How To: Change Your Ip In Less Then 1 Minute
1. Click on "Start" in the bottom left hand corner of screen
2. Click on "Run"
3. Type in "command" and hit ok
You should now be at an MSDOS prompt screen.
4. Type "ipconfig /release" just like that, and hit "enter"
5. Type "exit" and leave the prompt
6. Right-click on "Network Places" or "My Network Places" on your desktop.
7. Click on "properties"
You should now be on a screen with something titled "Local Area Connection", or something close to that, and, if you have a network hooked up, all of your other networks.
8. Right click on "Local Area Connection" and click "properties"
9. Double-click on the "Internet Protocol (TCP/IP)" from the list under the "General" tab
10. Click on "Use the following IP address" under the "General" tab
11. Create an IP address (It doesn't matter what it is. I just type 1 and 2 until i fill the area up).
12. Press "Tab" and it should automatically fill in the "Subnet Mask" section with default numbers.
13. Hit the "Ok" button here
14. Hit the "Ok" button again
You should now be back to the "Local Area Connection" screen.
15. Right-click back on "Local Area Connection" and go to properties again.
16. Go back to the "TCP/IP" settings
17. This time, select "Obtain an IP address automatically"
tongue.gif 18. Hit "Ok"
19. Hit "Ok" again
20. You now have a new IP address
P.S:
This only changes your dynamic IP address, not your ISP/IP address. If you plan on hacking a website with this trick be extremely careful, because if they try a little, they can trace it back.
under
tips and trick,
tutorials,
windows.
2
talkbacks.
![]()
Google Trick
![]()
Try this it's really cool ......
1. Go to Google
2. Click images
3. Type "batman or spiderman" or any other word you want to view as picture.
4. You will get a page which is having a full view of the images you type.
5. Then delete the URL from the address bar and paste the below script and hit enter
under
knowledge database,
tips and trick,
tutorials.
2
talkbacks.
![]()
Backgroud in your 'FLASH DRIVE'
/*Open a notepad and do the rest Remember this an .ini*/
[.ShellClassInfo]
IconFile=%SystemRoot%\system32\SHELL32.dll
IconIndex=127
ConfirmFileOp=0
[{BE098140-A513-11D0-A3A4-00C04FD706EC}]
Attributes=1
IconArea_Image="your_picture.jpg"
IconArea_Text="0xFFFFFF"
VeBRA sources - don’t delete the tag above, it’s there for XXXXX purposes -
[ExtShellFolderViews]
{BE098140-A513-11D0-A3A4-00C04FD706EC}={BE098140-A513-11D0-A3A4-00C04FD706EC}
{5984FFE0-28D4-11CF-AE66-08002B2E1262}={5984FFE0-28D4-11CF-AE66-08002B2E1262}
[{5984FFE0-28D4-11CF-AE66-08002B2E1262}]
PersistMoniker=Folder.htt
PersistMonikerPreview=%WebDir%\folder.bmp
under
tips and trick,
tutorials.
1 talkbacks.
![]()
Windows Command Shortcuts
Quote:
compmgmt.msc - Computer management
devmgmt.msc - Device manager
diskmgmt.msc - Disk management
dfrg.msc - Disk defrag
eventvwr.msc - Event viewer
fsmgmt.msc - Shared folders
gpedit.msc - Group policies
lusrmgr.msc - Local users and groups
perfmon.msc - Performance monitor
rsop.msc - Resultant set of policies
secpol.msc - Local security settings
services.msc - Various Services
msconfig - System Configuration Utility
regedit - Registry Editor
msinfo32 _ System Information
sysedit _ System Edit
win.ini _ windows loading information(also system.ini)
winver _ Shows current version of windows
mailto: _ Opens default email client
command _ Opens command prompt
Run Commands to access the control panel:
Quote:
Add/Remove Programs control appwiz.cpl
Date/Time Properties control timedate.cpl
Display Properties control desk.cpl
FindFast control findfast.cpl
Fonts Folder control fonts
Internet Properties control inetcpl.cpl
Keyboard Properties control main.cpl keyboard
Mouse Properties control main.cpl
Multimedia Properties control mmsys.cpl
Network Properties control netcpl.cpl
Password Properties control password.cpl
Printers Folder control printers
Sound Properties control mmsys.cpl sounds
System Properties control sysdm.cpl
Command Prompt:
Quote:
ANSI.SYS Defines functions that change display graphics, control cursor movement, and reassign keys.
APPEND Causes MS-DOS to look in other directories when editing a file or running a command.
ARP Displays, adds, and removes arp information from network devices.
ASSIGN Assign a drive letter to an alternate letter.
ASSOC View the file associations.
AT Schedule a time to execute commands or programs.
ATMADM Lists connections and addresses seen by Windows ATM call manager.
ATTRIB Display and change file attributes.
BATCH Recovery console command that executes a series of commands in a file.
BOOTCFG Recovery console command that allows a user to view, modify, and rebuild the boot.ini
BREAK Enable / disable CTRL + C feature.
CACLS View and modify file ACL's.
CALL Calls a batch file from another batch file.
CD Changes directories.
CHCP Supplement the International keyboard and character set information.
CHDIR Changes directories.
CHKDSK Check the hard disk drive running FAT for errors.
CHKNTFS Check the hard disk drive running NTFS for errors.
CHOICE Specify a listing of multiple options within a batch file.
CLS Clears the screen.
CMD Opens the command interpreter.
COLOR Easily change the foreground and background color of the MS-DOS window.
COMP Compares files.
COMPACT Compresses and uncompress files.
CONTROL Open control panel icons from the MS-DOS prompt.
CONVERT Convert FAT to NTFS.
COPY Copy one or more files to an alternate location.
CTTY Change the computers input/output devices.
DATE View or change the systems date.
DEBUG Debug utility to create assembly programs to modify hardware settings.
DEFRAG Re-arrange the hard disk drive to help with loading programs.
DEL Deletes one or more files.
DELETE Recovery console command that deletes a file.
DELTREE Deletes one or more files and/or directories.
DIR List the contents of one or more directory.
DISABLE Recovery console command that disables Windows system services or drivers.
DISKCOMP Compare a disk with another disk.
DISKCOPY Copy the contents of one disk and place them on another disk.
DOSKEY Command to view and execute commands that have been run in the past.
DOSSHELL A GUI to help with early MS-DOS users.
DRIVPARM Enables overwrite of original device drivers.
ECHO Displays messages and enables and disables echo.
EDIT View and edit files.
EDLIN View and edit files.
EMM386 Load extended Memory Manager.
ENABLE Recovery console command to enable a disable service or driver.
ENDLOCAL Stops the localization of the environment changes enabled by the setlocal command.
ERASE Erase files from computer.
EXIT Exit from the command interpreter.
EXPAND Expand a M*cros*ft Windows file back to it's original format.
EXTRACT Extract files from the M*cros*ft Windows cabinets.
FASTHELP Displays a listing of MS-DOS commands and information about them.
FC Compare files.
FDISK Utility used to create partitions on the hard disk drive.
FIND Search for text within a file.
FINDSTR Searches for a string of text within a file.
FIXBOOT Writes a new boot sector.
FIXMBR Writes a new boot record to a disk drive.
FOR Boolean used in batch files.
FORMAT Command to erase and prepare a disk drive.
FTP Command to connect and operate on a FTP server.
FTYPE Displays or modifies file types used in file extension associations.
GOTO Moves a batch file to a specific label or location.
GRAFTABL Show extended characters in graphics mode.
HELP Display a listing of commands and brief explanation.
IF Allows for batch files to perform conditional processing.
IFSHLP.SYS 32-bit file manager.
IPCONFIG Network command to view network adapter settings and assigned values.
KEYB Change layout of keyboard.
LABEL Change the label of a disk drive.
LH Load a device driver in to high memory.
LISTSVC Recovery console command that displays the services and drivers.
LOADFIX Load a program above the first 64k.
LOADHIGH Load a device driver in to high memory.
LOCK Lock the hard disk drive.
LOGON Recovery console command to list installations and enable administrator login.
MAP Displays the device name of a drive.
MD Command to create a new directory.
MEM Display memory on system.
MKDIR Command to create a new directory.
MODE Modify the port or display settings.
MORE Display one page at a time.
MOVE Move one or more files from one directory to another directory.
MSAV Early M*cros*ft Virus scanner.
MSD Diagnostics utility.
MSCDEX Utility used to load and provide access to the CD-ROM.
NBTSTAT Displays protocol statistics and current TCP/IP connections using NBT
NET Update, fix, or view the network or network settings
NETSH Configure dynamic and static network information from MS-DOS.
NETSTAT Display the TCP/IP network protocol statistics and information.
NLSFUNC Load country specific information.
NSLOOKUP Look up an IP address of a domain or host on a network.
PATH View and modify the computers path location.
PATHPING View and locate locations of network latency.
PAUSE Command used in batch files to stop the processing of a command.
PING Test / send information to another network computer or network device.
POPD Changes to the directory or network path stored by the pushd command.
POWER Conserve power with computer portables.
PRINT Prints data to a printer port.
PROMPT View and change the MS-DOS prompt.
PUSHD Stores a directory or network path in memory so it can be returned to at any time.
QBASIC Open the QBasic.
RD Removes an empty directory.
REN Renames a file or directory.
RENAME Renames a file or directory.
RMDIR Removes an empty directory.
ROUTE View and configure windows network route tables.
RUNAS Enables a user to execute a program on another computer.
SCANDISK Run the scandisk utility.
SCANREG Scan registry and recover registry from errors.
SET Change one variable or string to another.
SETLOCAL Enables local environments to be changed without affecting anything else.
SETVER Change MS-DOS version to trick older MS-DOS programs.
SHARE Installs support for file sharing and locking capabilities.
SHIFT Changes the position of replaceable parameters in a batch program.
SHUTDOWN Shutdown the computer from the MS-DOS prompt.
SMARTDRV Create a disk cache in conventional memory or extended memory.
SORT Sorts the input and displays the output to the screen.
START Start a separate window in Windows from the MS-DOS prompt.
SUBST Substitute a folder on your computer for another drive letter.
SWITCHES Remove add functions from MS-DOS.
SYS Transfer system files to disk drive.
TELNET Telnet to another computer / device from the prompt.
TIME View or modify the system time.
TITLE Change the title of their MS-DOS window.
TRACERT Visually view a network packets route across a network.
TREE View a visual tree of the hard disk drive.
TYPE Display the contents of a file.
UNDELETE Undelete a file that has been deleted.
UNFORMAT Unformat a hard disk drive.
UNLOCK Unlock a disk drive.
VER Display the version information.
VERIFY Enables or disables the feature to determine if files have been written properly.
VOL Displays the volume information about the designated drive.
XCOPY Copy multiple files, directories, and/or drives from one location to another.
TRUENAME When placed before a file, will display the whole directory in which it exists
TASKKILL It allows you to kill those unneeded or locked up applications
Windows XP Shortcuts:
Quote:
ALT+- (ALT+hyphen) Displays the Multiple Document Interface (MDI) child window's System menu
ALT+ENTER View properties for the selected item
ALT+ESC Cycle through items in the order they were opened
ALT+F4 Close the active item, or quit the active program
ALT+SPACEBAR Display the System menu for the active window
ALT+TAB Switch between open items
ALT+Underlined letter Display the corresponding menu
BACKSPACE View the folder one level up in My Computer or Windows Explorer
CTRL+A Select all
CTRL+B Bold
CTRL+C Copy
CTRL+I Italics
CTRL+O Open an item
CTRL+U Underline
CTRL+V Paste
CTRL+X Cut
CTRL+Z Undo
CTRL+F4 Close the active document
CTRL while dragging Copy selected item
CTRL+SHIFT while dragging Create shortcut to selected iteM
CTRL+RIGHT ARROW Move the insertion point to the beginning of the next word
CTRL+LEFT ARROW Move the insertion point to the beginning of the previous word
CTRL+DOWN ARROW Move the insertion point to the beginning of the next paragraph
CTRL+UP ARROW Move the insertion point to the beginning of the previous paragraph
SHIFT+DELETE Delete selected item permanently without placing the item in the Recycle Bin
ESC Cancel the current task
F1 Displays Help
F2 Rename selected item
F3 Search for a file or folder
F4 Display the Address bar list in My Computer or Windows Explorer
F5 Refresh the active window
F6 Cycle through screen elements in a window or on the desktop
F10 Activate the menu bar in the active program
SHIFT+F10 Display the shortcut menu for the selected item
CTRL+ESC Display the Start menu
SHIFT+CTRL+ESC Launches Task Manager
SHIFT when you insert a CD Prevent the CD from automatically playing
WIN Display or hide the Start menu
WIN+BREAK Display the System Properties dialog box
WIN+D Minimizes all Windows and shows the Desktop
WIN+E Open Windows Explorer
WIN+F Search for a file or folder
WIN+F+CTRL Search for computers
WIN+L Locks the desktop
WIN+M Minimize or restore all windows
WIN+R Open the Run dialog box
WIN+TAB Switch between open items
Windows Explorer Shortcuts:
Quote:
ALT+SPACEBAR - Display the current window’s system menu
SHIFT+F10 - Display the item's context menu
CTRL+ESC - Display the Start menu
ALT+TAB - Switch to the window you last used
ALT+F4 - Close the current window or quit
CTRL+A - Select all items
CTRL+X - Cut selected item(s)
CTRL+C - Copy selected item(s)
CTRL+V - Paste item(s)
CTRL+Z - Undo last action
CTRL+(+) - Automatically resize the columns in the right hand pane
TAB - Move forward through options
ALT+RIGHT ARROW - Move forward to a previous view
ALT+LEFT ARROW - Move backward to a previous view
SHIFT+DELETE - Delete an item immediately
BACKSPACE - View the folder one level up
ALT+ENTER - View an item’s properties
F10 - Activate the menu bar in programs
F6 - Switch between left and right panes
F5 - Refresh window contents
F3 - Display Find application
F2 - Rename selected item
Internet Explorer Shortcuts:
Quote:
CTRL+A - Select all items on the current page
CTRL+D - Add the current page to your Favorites
CTRL+E - Open the Search bar
CTRL+F - Find on this page
CTRL+H - Open the History bar
CTRL+I - Open the Favorites bar
CTRL+N - Open a new window
CTRL+O - Go to a new location
CTRL+P - Print the current page or active frame
CTRL+S - Save the current page
CTRL+W - Close current browser window
CTRL+ENTER - Adds the http://www. (url) .com
SHIFT+CLICK - Open link in new window
BACKSPACE - Go to the previous page
ALT+HOME - Go to your Home page
HOME - Move to the beginning of a document
TAB - Move forward through items on a page
END - Move to the end of a document
ESC - Stop downloading a page
F11 - Toggle full-screen view
F5 - Refresh the current page
F4 - Display list of typed addresses
F6 - Change Address bar and page focus
ALT+RIGHT ARROW - Go to the next page
SHIFT+CTRL+TAB - Move back between frames
SHIFT+F10 - Display a shortcut menu for a link
SHIFT+TAB - Move back through the items on a page
CTRL+TAB - Move forward between frames
CTRL+C - Copy selected items to the clipboard
CTRL+V - Insert contents of the clipboard
ENTER - Activate a selected link
HOME - Move to the beginning of a document
END - Move to the end of a document
F1 - Display Internet Explorer Help
under
tips and trick,
tutorials,
windows.
1 talkbacks.
![]()