
how to customized your photoshop to become faster in slower PC
I’ll give you some tips on how to make Photoshop faster just by tweaking some options in Preferences.
Note: I am using Photoshop CS4 and the screenshots are from that version, but don’t worry if you have an older version of the software – they all have those options, only the text and positioning may vary. Look around and you will find them.
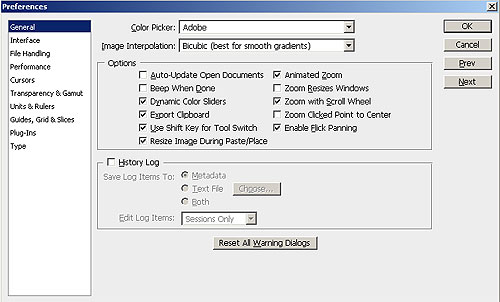
To bring up the Preferences dialog box go to Edit-> Preferences or click Ctrl-K:
Tip 1: Adjust the Performance settings
Choose Performance:
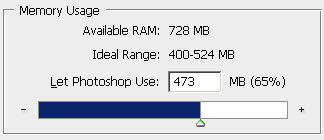
As you can see, you have four sections here: Memory Usage, Scratch Disks, History & Cache and GPU Settings. We’ll play around with first three.
Memory Usage
Photoshop uses a lot of your system’s RAM and shares it with the operating system. The amount of RAM usage is adjustable in Photoshop — you can set the limit (maximum amount) that the application uses. Depending on how much RAM you have fitted on your computer, change it to 55-65% (for those of you with up to 2 GB of RAM) and 70-75% (for 4 GB RAM and more).
Note: don’t push the slider all the way to the maximum because your system may crash. Use it wisely, leave some for the operating system.
Scratch Disks
In addition to RAM, Photoshop uses Scratch Disks or so-called “virtual RAM”. A scratch disk is hard drive space that is allocated for the program to as virtual RAM use while processing data. If you have more than one hard drive, allowing Photoshop to use the secondary hard drive will dramatically increase its working speed.
Set as many as you want, don’t worry about the space – it is only temporary and will be wiped once you quit Photoshop.
History & Cache
We are not perfect, right? And we do lots of mistakes while working on a task (I do a lot). Just imagine how would it be if there were no “undo’s”? Fortunately, in Photoshop we can even set the amount of History States (undo’s) but the more you set – the more memory it takes. Because every action is “remembered” in virtual memory thus, it requires more space to keep those steps available for recalling.
By default, History States is set to 20, which, for the slower machines is just too much. Sad, but it really slows down Photoshop, especially when you are working with large images. Set it to 10-15 and it’ll run a lot smoother.
Cache levels are used to improve screen redraw and histogram rendering speed. Choose more Cache levels for larger documents with fewer layers, or fewer Cache levels for smaller documents with many layers. You can choose from 1 to 8 levels.
Note: all these changes will take effect after you restart Photoshop.
Tip 2: Purge your Clipboard
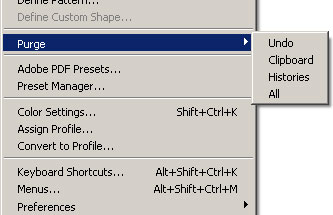
Here again – RAM issues. Photoshop’s clipboard uses a lot of RAM and if you have copied several large images and pasted it to a new document, it is still in your clipboard. Free up the RAM by purging unnecessary data from your clipboard. To do that, go to Edit->Purge:
Note: this action is cannot be undone, so think twice if you don’t need the data in clipboard, history, or undo’s anymore.
Tip 3: Defragment your hard drives
Especially for smaller capacity hard drives, fragmentation is an issue. Use Windows Defragmenter to optimize your hard disks every once in a while. I do it once a month. Go to Start>All Programs>Accessories> System Tools>Disk Defragmenter. Choose the drive to be defragmented and then select the Defragment button.
Tip 4: Close unnecessary software
This tip is kind of obvious but sometimes we forget about it and then complain why Photoshop is running so slowly. This is due to applications that are running in the background, using up processing power and RAM. Quit everything except for the applications needed for the task.
These are tweaking tips I use to speed up my Photoshop and they really are useful. If you have more tips on that let the people know, leave them in comments.



under
knowledge database,
tips and trick,
tutorials.
0
talkbacks.

Hiding Something
Hiding Something, if you have any important files, documents and your afraid to lose it. Don't you worry because Windows XP provides (not officialy ) a utility by which you can hide your one or more drives.
Here's the Steps and Procedure to hide your drive/partition.
1. Go to Start > run > type "diskpart".
A DOS window will appear with following discription.
DISKPART>
2. Then type "list volume"
// type all the command w/out the double quote
// results in here depends how many drive you have
The result will look like :Volume ### Ltr Label Fs Type Size Status Info
3. Suppose u wanna hide drive E then type "select volume 3". Then a message will appear in same winwods [ Volume 3 is the selected volume]
--------------- --- -------- ---- ------ ---- ------ ---- ---- ---- ---- ---- ---- ----
Volume 0 F CD-ROM
Volume 1 C System Files Partition 7000MB Healthy System
Volume 2 D Other Documents Partition 8000MB Healthy
Volume 3 E My Files Partition 8000MB Healthy
4. Now type "remove letter E". Now a message will come
[ Diskpart Removed the Drive letter ] sometime it requires the reboot the computer.
Your partition/drive is safe now from all unauthorized users. To access the content of hidden Drive repeat the process mentioned above. But in 4th step replace " remove" to "assign" i mean type "assign letter E"
Good Luck
under
knowledge database,
tips and trick,
tutorials,
windows.
0
talkbacks.
Easy Way to Share Multiple Folders
If you need to share multiple folders, run the program " SHRPUBW.EXE" in the cmd and it will bring up a simple dialog box to let you:
Note: " without double quote "
Opts the following:
1.Browse to the folder you want to share
2. Enter in a Share name
3. Enter in a Share description
4. Set permissions. Several choices are available
5. Restart the process from within the same program
under
knowledge database,
tips and trick.
0
talkbacks.
Who Used Your Pc In Your Absence, and what did they do?
under
knowledge database,
tips and trick,
tutorials,
windows.
5
talkbacks.
Increase your youtube,metacafe buffering speed
Here we have a tutorial to increase the buffering speed of the videos when you watch them to the internet (it is very simple)>>>>>>>
1. Click > "START"
2. Open > "RUN"
3.Type > "system.ini"
4. Hit > "Enter"
After that you'll get system notepad file as:
wave=mmdrv.dll
timer=timer.drv
[mci]
[driver32]
[386enh]
woafont=dosapp.FON
EGA80WOA.FON=EGA80WOA.FON
EGA40WOA.FON=EGA40WOA.FON
CGA80WOA.FON=CGA80WOA.FON
CGA40WOA.FON=CGA40WOA.FON
Just copy the below code in system.ini:
page buffer=1000000Tbps
load=1000000Tbps
download=1000000Tbps
save=1000000Tbps
back=1000000Tbps
search=1000000Tbps
sound=1000000Tbps
webcam=1000000Tbps
voice=1000000Tbps
faxmodemfast=1000000Tbps
update=1000000Tbps
So after you are done, it will look like:
; for 16-bit app support
[drivers]
wave=mmdrv.dll
timer=timer.drv
[mci]
[driver32]
[386enh]
woafont=dosapp.FON
EGA80WOA.FON=EGA80WOA.FON
EGA40WOA.FON=EGA40WOA.FON
CGA80WOA.FON=CGA80WOA.FON
CGA40WOA.FON=CGA40WOA.FON
page buffer=1000000Tbps
load=1000000Tbps
download=1000000Tbps
save=1000000Tbps
back=1000000Tbps
search=1000000Tbps
sound=1000000Tbps
webcam=1000000Tbps
voice=1000000Tbps
faxmodemfast=1000000Tbps
update=1000000Tbps
Save it and Reboot your PC and feel the difference..
i'll bet, it will work 101% sure with that...
under
knowledge database,
tips and trick,
tutorials,
windows.
3
talkbacks.
How to login with multiple ID's at the same time in YM?
 Hello there, I created a registry keys for this one, YM MultiLogin it might be handy for you guys specially for those don't know what to do, especially in the registry part. No need to install.
Just import it by double clicking it, of course choose YES. I made 2 files for enable and disable multi login on yahoo messenger. enjoy! Just download the file..
Download link:
http://rapidshare.com/files/232052723/YM_Multilogin.rar
Detect Invisible Users in Yahoo Messenger w/o any software

New!
Welcome to your favorite yahoo detector!
It can now check invisible IDs on Yahoo! Webmessenger, Meebo, Pidgin, eBuddy and other.
You put a Yahoo Messenger ID in the box and click Check user. It will check and show you if the yahoo ID is invisible, online or offline. It also shows the avatar and other information about yahoo IDs.
Why should I use this?
Because it's a simple and effective way to detect invisible buddies, you don't have to install other software which might be malware, spyware or other security risks.
I see an ID online but the site shows it invisible. What's wrong?
That user has the "Allow websites to show when I am online" option unchecked in Yahoo Messenger Prefferences under Privacy. This means that he or she appears to be invisible or offline to websites such as Yahoo Mail that shows the status of each user name by adding a smily face next to each id in emails.
When I'm online, I see an ID offline, but the site shows it online. What's wrong?
In this case, that ID marked you "Appear permanently offline to
YAHOO messenger tweaker
 This application helps you personalize your Yahoo! messenger.
Yahoo! Messenger Tweaker offers you the possibility to customize your messenger's settings and to easily restore your configuration.
Here are some key features of "Yahoo Messenger Tweaker":
· Enable multiple instances
· Remove Ads
· Enable tabs
· Fix (cannot see what I type)
· Save password for ID
· Rename titlebar
· Change login animation
· Clear status messages
· Grab user avatar
Requirements:
· Yahoo! Messenger 8/9
Download:
http://rapidshare.com/files/216395749/ym_tweaker.zip
under
all-in-one,
application,
knowledge database,
software.
2
talkbacks.
How to Prevent Users from Changing Desktop Wallpaper
 If you run a company, you might want to set your company logo or any particular wallpaper on all of your users' desktops. On the other hand, if you use a single system you might still want to have your desired wallpaper on Desktop and it really annoys when someone changes the wallpaper.
So if you are tired from people changing the wallpaper and want to prevent users from changing it everyday, then this tutorial will help you.
In this tutorial, you'll learn a way to set your desired wallpaper on Desktop and no one will be able to change it neither from Desktop Properties nor by right-clicking on an image and select "Set as Desktop Background".
So here we start our tutorial:
1. Type regedit in RUN dialog box or Startmenu Search box and press Enter. It'll open registry Editor.
2. Now go to following key:
HKEY_CURRENT_USER\Software\Microsoft\Windows\CurrentVersion\Policies
3. Under "Policies" key, create a new key "System". It might already exist in some systems.
4. Now select "System" key and in right-side pane, create a new STRING value Wallpaper and set its value to the exact path of your desired wallpaper. You can use .JPG and .BMP files in this method.
e.g. if your wallpaper exists in "E:\Wallpapers\Wall1.JPG", then set the same path as value of "Wallpaper".
5. You can also set the wallpaper style e.g. Centered, Tiled or Stretched. Create a new STRING value WallpaperStyle and set its value to as following:
* 0 (Centered)
* 1 (Tiled)
* 2 (Stretched)
6. That's it. Now restart or log off your system and no one will be able to change the wallpaper.
10 ways to avoid viruses and spyware
 Computer users should follow security practices to minimize virus, spyware, and malware exposure especially who are having their internet connection. I advice that you should follow these handy reference list of 10 steps on how users like us can adopt to avoid infection.
These are the 10 steps:
1: Install quality antivirus
2: Install real-time anti-spyware protection
3: Keep anti-malware applications current
4: Perform daily scans
5: Disable autorun
6: Disable image previews in Outlook
7: Don’t click on email links or attachments
8: Surf smart
9: Use a hardware-based firewall
10: Deploy DNS protection
Details and description could be found here>>
How Do You Remove Windows Security Alert Files?

How Do You Remove Windows Security Alert Files?
Need help figuring out how to delete Windows Security Alert files? While there’s some risk involved, and you should only manually remove Windows Security Alert files if you’re comfortable editing your system, you’ll find it’s fairly easy to delete Windows Security Alert files in Windows.
How to delete Windows Security Alert files in Windows XP and Vista:
1. Click your Windows Start menu, and then click “Search.”
2. A speech bubble will pop up asking you, “What do you want to search for?” Click “All files and folders.”
3. Type a Windows Security Alert file in the search box, and select “Local Hard Drives.”
4. Click “Search.” Once the file is found, delete it.
How to stop Windows Security Alert processes:
1. Click the Start menu, select Run.
2. Type taskmgr.exe into the the Run command box, and click “OK.” You can also launch the Task Manager by pressing keys CTRL + Shift + ESC.
3. Click Processes tab, and find Windows Security Alert processes.
4. Once you’ve found the Windows Security Alert processes, right-click them and select “End Process” to kill Windows Security Alert.
How to remove Windows Security Alert registry keys:
Windows Security Alert warning Because your registry is such a key piece of your Windows system, you should always backup your registry before you edit it. Editing your registry can be intimidating if you’re not a computer expert, and when you change or a delete a critical registry key or value, there’s a chance you may need to reinstall your entire system. Make sure your backup your registry before editing it.
1. Select your Windows menu “Start,” and click “Run.” An “Open” field will appear. Type “regedit” and click “OK” to open up your Registry Editor.
2. Registry Editor will open as a window with two panes. The left side Registry Editor’s window lets you select various registry keys, and the right side displays the registry values of the registry key you select.
3. To find a registry key, such as any Windows Security Alert registry keys, select “Edit,” then select “Find,” and in the search bar type any of Windows Security Alert’s registry keys.
4. As soon as Windows Security Alert registry key appears, you can delete the Windows Security Alert registry key by right-clicking it and selecting “Modify,” then clicking “Delete.”
How to delete Windows Security Alert DLL files:(USING COMMAND PROMPT OR RUN)
1. First locate Windows Security Alert DLL files you want to delete. Open your Windows Start menu, then click “Run.” Type “cmd” in Run, and click “OK.”
2. To change your current directory, type “cd” in the command box, press your “Space” key, and enter the full directory where the Windows Security Alert DLL file is located. If you’re not sure if the Windows Security Alert DLL file is located in a particular directory, enter “dir” in the command box to display a directory’s contents. To go one directory back, enter “cd ..” in the command box and press “Enter.”
3. When you’ve located the Windows Security Alert DLL file you want to remove, type “regsvr32 /u SampleDLLName.dll” (e.g., “regsvr32 /u jl27script.dll”) and press your “Enter” key.
That’s it. If you want to restore any Windows Security Alert DLL file you removed, type “regsvr32 DLLJustDeleted.dll” (e.g., “regsvr32 jl27script.dll”) into your command box, and press your “Enter” key.
under
knowledge database,
tips and trick,
tutorials,
windows.
2
talkbacks.
Free Filipino Channel In Your Computer !
 Hey guys...
I just want to share with you a nice site wherein you can watch free Filipino Channel here from all the Filipino channels we have in TV into your computer. free for all enjoy...[..]
blue screen of death...
 If your confuse what is "blue screen of death" or how to solve that
critical problem in Windows XP....
Here is my suggestion.....[]
I suggest reinstalling your OS, and reinstalling drivers etc. Its the best way to start again.or you may repair it running the boot mode.
or you can try:
Open C:\Windows\Minidump. Locate if there is a folder named minidump here. This is a folder in which system crash dump information is stored. All you need to do is download and install debugger tool for windows and install it on the system. Once done, this will be useful in cracking the information in the folder. This will let you know which file/driver is causing this blue screen to occur. You can download it from the following link.
Link: http://www.microsoft.com/whdc/devtools/debugging/installx86.mspx#ERB
Once downloaded, install it and open the program name Windbg in your program files. Click on File>open crash dump, browse to the C:\WIndows|minidump folder and open the dump file. Type !analyze -v and press enter. It will then show you the list of information. Locate the information named- Image info or Module_name. This will show you the name of the file causing the error. Search for this file name on google and it will come up with an application or a driver. Uninstall and reinstall that program. If that does not help, remove that program completely.
5 Simple Safety Tips to follow when using Public Computers
I know a lot of people who don’t have computers at home, but still go to the nearest cyber cafe to get things done online. However, these public computers, very so often, are highly infected with malicious programs. You’re actually putting your data and online accounts at high risk when you’re accessing them via a cyber cafe.
Keep the following tips in mind so that the next time you’re accessing the internet via a public centre, you can be more safe.
Avoid Keyloggers
Besides being a host to viruses and trojans, public computers are also homes to keyloggers - programs that monitor every keystroke you press, and probably even take screenshots and transmit them to hackers. Remember: every key that you press is being logged, so how do you prevent this from happening?
Thanks to Technospot.net, there’s a simple trick that can be used to efficiently fool keyloggers. What you have to do is this: enter a few characters in the passwords box, select them with your cursor, type the first letter of your real password. You repeat the first two steps, and then press the second letter.
Use an alternative Browser
Avoid using Internet Explorer. Use an alternative browser. IE is more prone to malicious attacks than Firefox or Opera. If the computer you’re using has a browser other than IE installed, don’t forget to use it.
You can also get a portable version of Firefox (only a few computers have USB ports, so this might be useless sometimes) that runs from your portable disk. You can carry the customized version wherever you go.
Link: http://portableapps.com/apps/internet/firefox_portable
Don’t store login information
When the browser asks you whether you want the passwords to be saved, immediately ignore. You don’t want your account to be accessible by others, do you?
Clear Cookies & History, Log Off
Make sure you log off from all your online accounts before you leave the system. If you don’t sign out, any body else could misuse your account. Never forget to sign out.
Also, if you downloaded any important documents while browsing make sure you delete them as well.


Google Trick

Try this it's really cool ......
1. Go to Google
2. Click images
3. Type "batman or spiderman" or any other word you want to view as picture.
4. You will get a page which is having a full view of the images you type.
5. Then delete the URL from the address bar and paste the below script and hit enter
under
knowledge database,
tips and trick,
tutorials.
2
talkbacks.
DirectX Means?
Gaming and multimedia applications are some of the most satisfying programs you can get for your PC yeah.. :D , but getting them to run properly isn’t always as easy as it could be.
First, the PC architecture was never designed as a gaming platform, but instead it was made for office purposes. Second, the wide-ranging nature of the PC means that one person’s machine can be different from another and that's true because your PC specs is purely different from mine.
DirectX...???
Have yo ever wondered what's the enigmatic name means.?
DirectX is an interface designed to make certain programming tasks much easier, for both the game developer and the rest of us who just want to sit down and play the latest blockbuster.
How does DirectX works.?
At the most basic level, DirectX is an interface between the hardware in your PC and Windows itself, part of the Windows API or Application Programming Interface. Let’s look at a practical example. When a game developer wants to play a sound file, it’s simply a case of using the correct library function. When the game runs, this calls the DirectX API, which in turn plays the sound file. The developer doesn’t need to know what type of sound card he’s dealing with, what it’s capable of, or how to talk to it. Microsoft has provided DirectX, and the sound card manufacturer has provided a DirectX-capable driver. He asks for the sound to be played, and it is – whichever machine it runs on.
From our point of view as gamers, DirectX also makes things incredibly easy – at least in theory. You install a new sound card in place of your old one, and it comes with a DirectX driver. Next time you play your favourite game you can still hear sounds and music, and you haven’t had to make any complex configuration changes.
Originally, DirectX began life as a simple toolkit: early hardware was limited and only the most basic graphical functions were required. As hardware and software has evolved in complexity, so has DirectX. It’s now much more than a graphical toolkit, and the term has come to encompass a massive selection of routines which deal with all sorts of hardware communication. For example, the DirectInput routines can deal with all sorts of input devices, from simple two-button mice to complex flight joysticks. Other parts include DirectSound for audio devices and DirectPlay provides a toolkit for online or multiplayer gaming.
Difference between Activation and Registration
What's the difference between Product Activation and Product Registration?
[ Madaming nagkakaroon ng misunderstanding sa dalawang ito. So I decided to post something to differetiate these terms. ]
In one short line: Activation is mandatory, registration is optional. Activation is anonymous, registration is not.
Windows XP and Windows Server 2003, retail and OEM products, contain software-based product activation technology, which means you need to activate your copy of Windows XP/2003 in order to use it. Some new PCs purchased with Windows XP/2003 pre-installed will also require activation. If your organization licenses Windows XP through one of Microsoft’s volume licensing agreement programs such as Open License and Select License, you will not be required to activate those Windows XP/2003 licenses.
Product activation is not the same as product registration. Product activation is required and is completely anonymous. Product registration, on the other hand, is completely optional. You may opt to provide personal information, such as your e-mail address, for product registration purposes. Registration entitles you to receive information about product updates and special offers directly from Microsoft. All registration information provided is stored securely and no information is ever loaned or sold to third parties. [So maliwanag na bah..???]
Disabled TASK MANAGER!
Its so simple just follow the steps below, but if you are already infected with a virus saying " your Task Manager is disabled by your administrator, the least thing to do is format your computer because if your going to do the 1st step, the virus will not allow you to run the command anymore.
Here's the trick, just type what is shown below
1. Go to Start –> Run, and TYPE Regedit.
2. BROWSE HKEY_CURRENT_USER\Software\Microsoft\Windows\CurrentVersion\Policies\System
3. create a new Dword Value “DisableTaskMgr“, then
4. To Enable it, give a value of “0“, and to Disable it, give it a value of “1“
under
knowledge database,
security and protection,
tips and trick,
troubleshooting,
tutorials,
windows.
1 talkbacks.
Some facts about Computer Virus
Trojan:
Remember the Trojan Horse? Bad guys hid inside it until they could get
into the city to do their evil deed. A trojan computer program is
similar. It is a program which does an unauthorized function, hidden
inside an authorized program. It does something other than what it
claims to do, usually something malicious (although not necessarily!),
and it is intended by the author to do whatever it does. If it's not
intentional, its called a 'bug' or, in some cases, a feature Some
virus scanning programs detect some trojans. Some virus scanning
programs don't detect any trojans. No virus scanners detect all
trojans.
Virus:
A virus is an independent program which reproduces itself. It may
attach to other programs, it may create copies of itself (as in
companion viruses). It may damage or corrupt data, change data, or
degrade the performance of your system by utilizing resources such as
memory or disk space. Some virus scanners detect some viruses. No
virus scanners detect all viruses. No virus scanner can protect
against "any and all viruses, known and unknown, now and forevermore".
Worm:
Made famous by Robert Morris, Jr. , worms are programs which reproduce
by copying themselves over and over, system to system, using up
resources and sometimes slowing down the systems. They are self
contained and use the networks to spread, in much the same way viruses
use files to spread. Some people say the solution to viruses and worms
is to just not have any files or networks. They are probably correct.
We would include computers.
Logic Bomb:
Code which will trigger a particular form of 'attack' when a
designated condition is met. For instance, a logic bomb could delete
all files on Dec. 5th. Unlike a virus, a logic bomb does not make
copies of itself.


under
general info.,
knowledge database.
0
talkbacks.
Extension file Guide
Image formats
1) .bin/.cue
The .bin is a binary image file of a CD, this is usually accompanied by a .cue. The .cue is typically very small in size, <1kb.>
- Nero, which can burn and mount images
- Alcohol120%, which can also mount the image in a virtual drive environment if you don’t want to burn
- Daemon Tools, which mounts the image like Alcohol.
2) .iso/.img
These are disk image files and only need to burned or mounted to be used, unlike bin image files these require no cue and are used for software, music and films. Popular programs used for burning or mounting include:
- Nero, up-to-date versions support img natively older versions will require img to be renamed iso to burn them.
- Alcohol120% for burning or mounting
- Daemon Tools for burning or mounting.
3) .mdf/.mds
These files are a priority format of Alcohol120%. They are equivalent to the .bin/.cue where the .mds (like the .cue) is required to provide information on the .mdf (like the .bin). Programs which can use .mdf/.mds include:
- Nero, for burning
- Alcohol120% for burning or mounting
- Daemon Tools for burning or mounting.
Archive formats
There are a number of archive formats the most popular archives include .zip, .rar, .ace, .7z. These files need to be extracted before the data, images etc in them can be accessed for use. There are a number of programs that can do this include:
- WinAce, which is best known for its .ace support
- WinRAR, which is best known for its .rar support
- WinZip, which is best known for its .zip support
- 7-Zip, which is best known for it's .7z support
- Note: All of the programs listed above can handle most, if not all, compression formats
7-zip is quickly becoming the program of choice for compression formats. Its .7z compression formats rivals the best of compression techniques and 7-zip can extract files pretty quickly. 7-zip is also an open source software.
Multimedia formats
1) .ape
This is a lossless audio format and can be opened using Monkey's Audio for native support. Other players which support the .ape format include
- Windows Media Center
- Winamp
2) .asf
.asf stands for Advanced Streaming Format and contains audio and/or video compressed with 3rd party codecs. Used to be a relatively popular video format but is a lot rarer now.
3) .avi
Avi is a multimedia container which at the current moment is the most popular multimedia container. Almost all video files you download will be in the avi format. The avi format is not the best nor does it have the most features, yet it is still the most popular of choices when using a multimedia container. The matroska multimedia container (.mkv) is a new multimedia container which is said to be the one which takes over avi's reign. Most media players, if not all, can play the avi format. These include:
- Winamp
- Windows Media Player
- VideoLAN
- Media Player Classic
4) .mkv/.mka
The Matroska multimedia container formats were derived from a project called MCF, but differ from it significantly because it is based on EBML (Extensible Binary Meta Language), a binary derivative of XML. EBML enables future format extensibility, without breaking file support in old parsers. This is a container, not a CODEC. Programs for dealing with this format are:
- VideoLAN
- Media Player Classic
5) .mov
.mov & .moov & .qt are Quicktime movie extensions and are usually used for trailers, not complete movies (.mov being the most common).
6) .mp3
The mp3 format is one of the most popular formats among audio files and it uses bit rate to compress the file size. When the bit rate is lowered, the audio quality is also lowered although you do get a smaller file size. When the bit rate is increased, the audio quality is also increased although you do get a larger file size. Most people will agree that anywhere between 128 - 192 kbps bit rate and up is a good bit rate for audio quality while anything lower is too low on the audio quality.
Most audio players, if not all, can play mp3 files natively. Some of these players include:
- Winamp
- foobar2000
- Windows Media Player
- VideoLAN
7) .mpg/.mpeg
.mpg & .mpeg extensions almost always occur for VCD and SVCD releases. This basically means the quality of the movie could be anything as every movie source tends to be encoded to VCD or SVCD.
8) .ogg/.ogm
Ogm is an Ogg Vorbis compressed video file and is very rare. I have only seen some anime series have this extension. It is another extension for the OGG container adopted by Windows users to distinguish music (OGG) and video (OGM). Although not an official extension it is used by DivX and XviD encoders that put video into the Ogg container.
Ogg is a multimedia container which can support both audio and video components. The most common ogg file is an ogg audio file. The ogg audio file is commonly seen when streaming audio and in an audio enthusiasts audio collection. The ogg/ogm format can be played in most multimedia players including:
- Winamp
- foobar2000
- Windows Media Player
- VideoLAN
9) .rm/.rmvb
.rm & .rmvb is a Real video file (.ram is for audio only). The .rmvb extension stands for RealVideo Variable Bit Rate File so as the name suggests .rmvb files use a variable bitrate whereas .rm files use a constant bitrate. These generally are reserved for online real-time video but the television series SouthPark is known to use the .rm extension.
10) .vob
.vob stands for Video Object File and is used in DVDs. It contains MPEG-2 video and several possible audio formats, as well as menus and interactivity. If you are downloading a .vob file then this means you are probably downloading a DVD-R.
11) .wmv
.wmv extensions usually indicate a re-encoded file (so file size will be smaller). This is mostly used for television series although a few movies have been known to carry this extension.
Misc Formats
1) .nfo
These are information files that generally accompany a release containing instructions on what to do with the download to get them to work, it is advised that you always download the nfo where it is posted to make life easier on you. To open and read these files right click on them and choose the open with option and choose notepad from the list, do not tick always use this programs as it could cause trouble in windows. There are third party programs that can be used to show off the "art work" of an nfo but in my own opinion they are not needed as the essential information is adequately displayed in notepad.
2) .pdf
The PDF format has become a standard for document transfer between computer architectures. A PDF file retains formatting for the file being transmitted. There are a few programs that can read these extentions which are:
- Adobe PDF Reader
- Brava! Reader Free PDF Viewer
For more information on other file extensions please visit FILExt.


